How to Remove Wax from Apples: Safe, Simple Methods for Cleaner Fruit
Learn how to remove wax from apples safely and effectively using simple household ingredients like baking soda, vinegar, and lemon juice. Discover step-by-step methods, storage tips, and answers to common questions for cleaner, fresher-tasting apples.
Store-bought apples often look shiny and perfect, but that glossy appearance usually comes from a layer of wax. While some wax is naturally produced by the apple itself, commercial apples are frequently coated with additional food-grade wax to extend shelf life, reduce moisture loss, and keep them looking appealing during transport and display. Many people prefer to remove this wax before eating apples, especially when serving children or using apples in juices, baby food, or recipes where the peel is included.
This guide explains exactly how to remove wax from apples safely and effectively at home. You will learn why wax is used, which methods work best, and how to wash apples correctly so you can enjoy cleaner, fresher-tasting fruit.
Why Are Apples Waxed?
Apples naturally produce a thin protective wax layer on their skin. This natural wax helps the fruit retain moisture and stay firm. However, during washing and processing, much of this natural wax is removed. To prevent apples from drying out and to keep them looking fresh, producers often apply a thin coating of food-grade wax.
Common reasons apples are waxed
- Moisture retention: Wax slows water loss so apples stay crisp longer.
- Protection during transport: The coating helps reduce bruising and damage.
- Improved appearance: A shiny surface makes apples look fresher and more attractive on store shelves.
- Extended shelf life: Less moisture and air contact means a longer storage period.
The waxes approved for food use include carnauba wax, shellac, and other plant-based or synthetic food-grade coatings. Regulatory agencies typically consider these safe to eat in small quantities, but many consumers still prefer to reduce or remove them, especially when they are sensitive to additives or want a more natural eating experience.
Is Wax on Apples Harmful?
Most commercial wax coatings are considered food safe. They are applied in very small amounts and must meet safety standards. However, there are several reasons someone might prefer to remove or reduce wax on the apple surface:
- Personal preference: Some people dislike the texture or idea of eating wax.
- Potential contaminants: Dirt, dust, handling residue, and traces of pesticides can cling to the wax layer.
- Sensitive individuals: People with allergies or digestive sensitivities may want to minimize additives.
- Better flavor: Cleaned apples often taste fresher and less coated.
Removing wax does not eliminate all pesticide residues or contaminants, but it can help reduce them, especially when combined with thorough washing techniques. For the safest option, consider buying organic apples when possible and washing them carefully before eating.
How to Tell if an Apple Is Waxed
Not every apple is heavily waxed, and some varieties naturally look shinier than others. Use the following simple clues to decide whether an apple likely has an added wax coating:
- High gloss shine: If the apple looks unusually shiny and almost polished, it is probably waxed.
- Greasy feel: Gently rub the surface with your fingers. A slightly slippery or greasy feel suggests wax.
- Scratch test: Lightly scrape the peel with your fingernail or a knife edge. If you see a thin, slightly white or cloudy layer come off, that is wax.
- Sticker information: Some packaging or labels mention "coated with food-grade wax" or similar wording.
Regardless of whether the apple is waxed heavily or not, it is always a good idea to wash apples thoroughly before eating.
Essential Safety Tips Before You Start
Before tackling wax removal, keep these safety guidelines in mind to protect both your health and the quality of your fruit.
- Do not use dish soap: Household detergents and soaps are not designed for consumption and can leave harmful residues on the apple.
- Avoid harsh chemicals: Bleach, disinfectants, or non-food-grade cleaners should never be used on fruit.
- Use clean tools: Make sure your sink, bowls, brushes, and hands are clean to avoid cross-contamination.
- Do not soak for too long: Extended soaking (for hours) can affect texture and flavor.
- Rinse thoroughly: Always finish with running water to remove loosened wax and any cleaning mixture.
Best Methods to Remove Wax from Apples
There is no single "perfect" method that fits all situations. Instead, choose from a set of proven approaches using simple household ingredients. Combining gentle abrasion with warm water and mild, food-safe acids like vinegar or lemon juice usually works best.
Method 1: Warm Water and Rubbing
This is the simplest method and a good first step for any apple, waxed or not. Warm water (not hot enough to cook or damage the fruit) helps soften and loosen the wax layer so it can be rubbed away.
What you need
- Clean sink or large bowl
- Warm water (comfortable to the touch, not scalding)
- Clean hands or a soft produce brush
- Clean kitchen towel or paper towels
Step-by-step instructions
- Fill the sink or bowl: Add enough warm water to fully submerge your apples.
- Place apples in the water: Let them sit for 30–60 seconds so the warmth begins to soften the wax.
- Rub each apple: Using clean hands, firmly rub the surface of each apple with your fingers or palms. Focus on shiny or greasy areas.
- Use a soft brush (optional): If needed, scrub gently with a soft produce brush in circular motions.
- Rinse under running water: Hold each apple under cool running water and continue rubbing to wash away loosened wax.
- Dry thoroughly: Pat the apples dry with a clean towel to remove any remaining residue and prevent moisture-related spoilage.
This method works well for lightly waxed apples and as a basic cleaning step before using more intensive techniques.
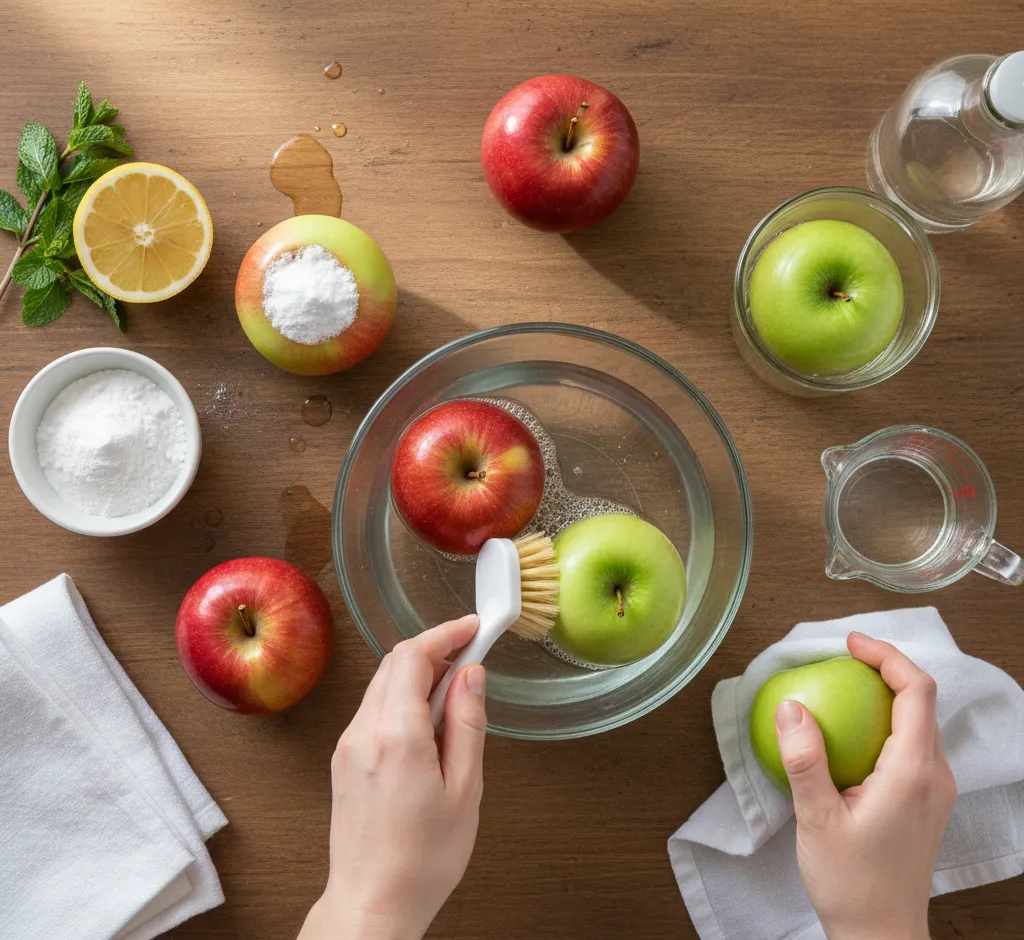
Method 2: Baking Soda Scrub
Baking soda is a gentle, food-safe abrasive that helps break up and lift wax without damaging the skin of the apple. It also assists in removing surface dirt and residues.
What you need
- 1–2 tablespoons of baking soda
- Bowl of warm water
- Soft cloth, sponge, or produce brush
- Clean towel for drying
Step-by-step instructions
- Rinse apples first: Quickly rinse your apples under cool running water to remove loose dirt.
- Prepare baking soda paste: In a small bowl, mix baking soda with a little warm water until you form a thick, spreadable paste.
- Apply the paste: Using your hands, cloth, or a soft brush, spread a small amount of the paste onto the apple peel.
- Scrub gently: Rub the surface in circles, covering all sides of the apple. You may see the shine reduce as the wax loosens.
- Rinse thoroughly: Rinse each apple under running water, continuing to rub until no baking soda remains.
- Dry: Pat dry with a clean towel and store or eat as desired.
The baking soda method is especially effective when apples feel very slick or glossy. It is safe for most apple varieties, but do not scrub so hard that you bruise the fruit.
Method 3: Vinegar Wash
White vinegar is a popular, budget-friendly cleaner in the kitchen. A diluted vinegar solution helps cut through wax and may reduce some surface bacteria at the same time. Because vinegar is acidic, always dilute it with water before using it on fruit.
What you need
- 1 part white vinegar
- 3 parts cool or lukewarm water
- Large bowl or clean sink
- Soft brush or hands for rubbing
- Clean towel for drying
Step-by-step instructions
- Prepare the solution: Mix 1 cup of white vinegar with 3 cups of water (or keep the same 1:3 ratio for larger amounts) in a bowl or sink.
- Add apples: Place apples into the mixture, making sure they are fully submerged.
- Soak briefly: Let the apples soak for 30 seconds to 2 minutes. There is no need for long soaking times.
- Rub the peel: Using your hands or a soft brush, gently scrub the surface of each apple while it is in the solution.
- Rinse well: Remove apples and rinse thoroughly under running water to eliminate both vinegar taste and loosened wax.
- Dry completely: Pat dry before storing or eating to help maintain crispness.
Proper rinsing is essential with this method, as leftover vinegar can slightly change the flavor. When done correctly, apples will taste clean and fresh, not sour.
Method 4: Lemon and Baking Soda Combination
Combining the mild acid of lemon juice with the gentle abrasiveness of baking soda creates a powerful, food-safe cleaning mixture. This method is ideal when apples feel heavily coated or when you want a more natural cleaning solution with a pleasant scent.
What you need
- 1–2 fresh lemons (or bottled lemon juice)
- 2–3 tablespoons baking soda
- Bowl of water
- Soft cloth or produce brush
- Clean towel
Step-by-step instructions
- Rinse apples: Quickly rinse apples under cool water to remove loose debris.
- Prepare the mixture: In a bowl, combine baking soda with enough lemon juice to create a foaming paste. Add a splash of water if needed to loosen the mixture slightly.
- Apply to apples: Using clean hands or a soft cloth, spread a thin layer of the lemon–baking soda paste over each apple.
- Scrub gently: Rub in small circles, covering the entire peel. The mild fizzing action helps lift wax and residue.
- Rinse thoroughly: Rinse under running water until no paste remains and the surface feels clean, not slippery.
- Dry well: Pat dry and allow excess moisture to evaporate before storing.
This method leaves apples smelling bright and fresh. It works especially well before juicing or using apples in salads where the peel remains on.
Method 5: Blanch and Rub (Carefully)
Very brief exposure to hot water can soften wax on the apple surface, making it easier to rub off. However, the water must not be so hot that it cooks or damages the fruit. This method requires careful control and is best used occasionally, not as an everyday practice.
What you need
- Pot or kettle for heating water
- Bowl of very warm (not boiling) water
- Cool water for rinsing
- Soft brush or cloth
- Clean towel
Step-by-step instructions
- Heat water: Warm water until it is hot but not boiling. It should be comfortable to touch for a few seconds (around the temperature of a hot bath).
- Pour into a bowl: Transfer the hot water into a large bowl or sink away from heat.
- Dip apples briefly: Submerge each apple for 10–20 seconds, rolling it around so all sides contact the warm water.
- Rub the surface: Remove the apple and immediately rub with a cloth or brush to remove softened wax.
- Rinse in cool water: Rinse thoroughly under cool running water to stop any warming effect and wash away residue.
- Dry carefully: Pat dry and let apples cool fully before storing.
Use this method gently. Water that is too hot or prolonged soaking can damage the skin and shorten the apple’s shelf life.
Is Peeling Apples Necessary?
Some people choose to avoid the wax issue altogether by peeling their apples. While peeling does effectively remove wax and much of the surface residue, it also removes important nutrients.
Pros of peeling apples
- Removes wax and surface contaminants almost completely.
- Reduces exposure to pesticide residues concentrated on the peel.
- Creates a smoother texture for sauces, baby food, or certain baked goods.
Cons of peeling apples
- Loss of fiber, vitamins, and antioxidants found in the skin.
- Less satisfying texture and flavor in raw snacks and salads.
- More food waste and extra preparation time.
For most people, a balanced approach works best: wash apples thoroughly using one of the wax-removal methods, then enjoy them with the peel on to get maximum nutrition. Reserve peeling for recipes that specifically require it.
How to Store Apples After Wax Removal
Once wax has been reduced or removed, apples may lose moisture slightly faster, so proper storage becomes more important. Follow these tips to keep your cleaned apples fresh and crisp.
- Dry completely: Any leftover water on the surface can encourage mold or soft spots.
- Refrigerate for longer storage: Store apples in the crisper drawer in a breathable bag or container with small ventilation holes.
- Separate from strong odors: Apples can absorb odors from pungent foods, so keep them away from onions, garlic, and strong cheeses.
- Check regularly: If one apple develops soft spots or mold, remove it so it does not affect others.
For short-term use (1–2 days), washed apples can be kept at room temperature in a fruit bowl, but they will last longer and stay crisper in the refrigerator.
Frequently Asked Questions About Wax on Apples
Does washing apples with just water remove all the wax?
Plain water, especially cold water, usually removes only a small portion of the wax. Rubbing the skin under running water helps, but for heavily waxed apples a combination of warm water with gentle abrasion, baking soda, vinegar, or lemon is more effective.
Can dish soap be used to remove wax from apples?
No. Dish soap is formulated for cleaning plates and cookware, not food. It can leave chemical residues that are not intended for consumption, even after rinsing. Stick to food-safe ingredients such as baking soda, vinegar, or lemon juice.
Are organic apples waxed too?
Organic apples can also be waxed, but the coatings must comply with organic regulations, which usually limit the types of wax used. Even with organic fruit, a proper wash is recommended to remove dirt, natural wax buildup, and handling residue.
Does removing wax also remove pesticides?
Removing wax can help reduce some pesticide residues and contaminants that are trapped in or on the coating. However, pesticides can also penetrate the skin to a limited extent, so no washing method removes everything. Choosing organic apples and washing thoroughly provides the best combination of reduced exposure and good nutrition.
Do commercial fruit washes work better than homemade methods?
Some commercial fruit and vegetable washes are designed to help break down wax and residues. Many are effective, but simple homemade solutions using baking soda or diluted vinegar often work just as well at a lower cost. Always follow the directions on any commercial product and rinse thoroughly afterward.
Key Takeaways: Cleaner Apples at Home
Wax on apples helps protect the fruit during storage and transport, but many people prefer to remove or reduce it before eating. The good news is that you can effectively remove wax from apples at home using simple, safe ingredients you likely already have in your kitchen.
- Use warm water and firm rubbing as a basic first step.
- Boost cleaning power with baking soda, vinegar, or lemon juice.
- Avoid dish soap and harsh chemicals, which are not meant for food.
- Peeling is an option, but thorough washing lets you keep the nutrient-rich skin.
- Dry and store apples properly after cleaning to maintain freshness.
By adopting one or more of these methods, you can enjoy apples that are clean, crisp, and closer to their natural state, whether you eat them fresh, bake them into pies, or blend them into smoothies.