Quick Tips for Cleaning Snap Peas Like a Pro
Learn quick, easy tips for cleaning snap peas like a pro. Discover how to wash, trim, and remove strings, plus smart storage and prep hacks for crisp, sweet peas.
Sugar snap peas are one of the quickest, crunchiest, and most versatile vegetables you can prepare. Whether you love to snack on them raw, toss them into stir-fries, or add them to salads and pasta dishes, learning how to clean snap peas properly will make them taste fresher, last longer, and look more appealing on the plate.
This guide walks through simple, time-saving tips for cleaning snap peas, from washing and trimming to string removal and storage. These practical steps will help you handle snap peas like a pro, even on a busy weeknight.
Why Cleaning Snap Peas Matters
Cleaning snap peas is about more than just rinsing away visible dirt. Proper prep:
- Removes grit and residues from the field, transportation, and packaging.
- Improves texture by getting rid of tough strings and dry ends.
- Enhances flavor so every bite tastes crisp, sweet, and fresh.
- Boosts food safety by reducing microbes and potential contaminants.
- Makes cooking easier because prepped peas can go straight into your recipe.
It only takes a few minutes to clean snap peas, and the payoff in taste and texture is huge.
How to Choose Snap Peas That Are Easy to Clean
Cleaning starts at the store or market. Fresh, high-quality snap peas are easier to prep and require less trimming.
Look for freshness cues
- Color: Choose peas that are bright green, not yellowing or spotted.
- Texture: Pods should feel firm and crisp, not limp or rubbery.
- Sound: Fresh snap peas make a clean snap when gently bent.
- Surface: Avoid peas that look wrinkled, shriveled, or slimy.
Avoid peas that need excessive trimming
- Skip pods with brown tips or heavily dried ends.
- Pass on peas with black spots or moldy patches.
- Avoid bags with lots of broken or split pods, which spoil faster.
Choosing fresher peas means you can spend less time cutting away damaged parts and more time enjoying them.
Quick Prep Setup: What You Need
Before you start cleaning snap peas, set up a simple workstation. This makes the process faster and more efficient.
- A large bowl for washing.
- A colander or strainer for draining.
- A small sharp knife or kitchen shears for trimming ends.
- A clean kitchen towel or paper towels for drying.
- A cutting board (optional but helpful for large batches).
Having everything within reach helps you clean snap peas in one smooth, continuous flow.
Step 1: Rinse Snap Peas Thoroughly
Start by washing your snap peas to remove dirt, sand, and any residues from the field or packaging.
How to rinse snap peas quickly
- Place the snap peas in a large bowl or directly into a colander.
- Rinse under cool running water, using your hands to gently rub and rotate the pods.
- Check for any stuck-on dirt or debris and gently rub it off with your fingers.
- Let the peas drain fully in the colander for a minute or two.
For peas that seem extra dusty or sandy, fill a bowl with cool water, swish the peas around, then lift them out into a colander. This lets the dirt fall to the bottom of the bowl instead of clinging to the pods.
Do you need to use vinegar or produce wash?
For everyday cooking, cool water and gentle rubbing are usually enough. If you want an extra level of cleanliness, especially for raw snacking, you can:
- Soak peas briefly in a mix of 1 part vinegar to 3 parts water, then rinse well.
- Use a food-safe produce wash following the label instructions.
Always rinse snap peas thoroughly after any soak so the flavor stays sweet and crisp.
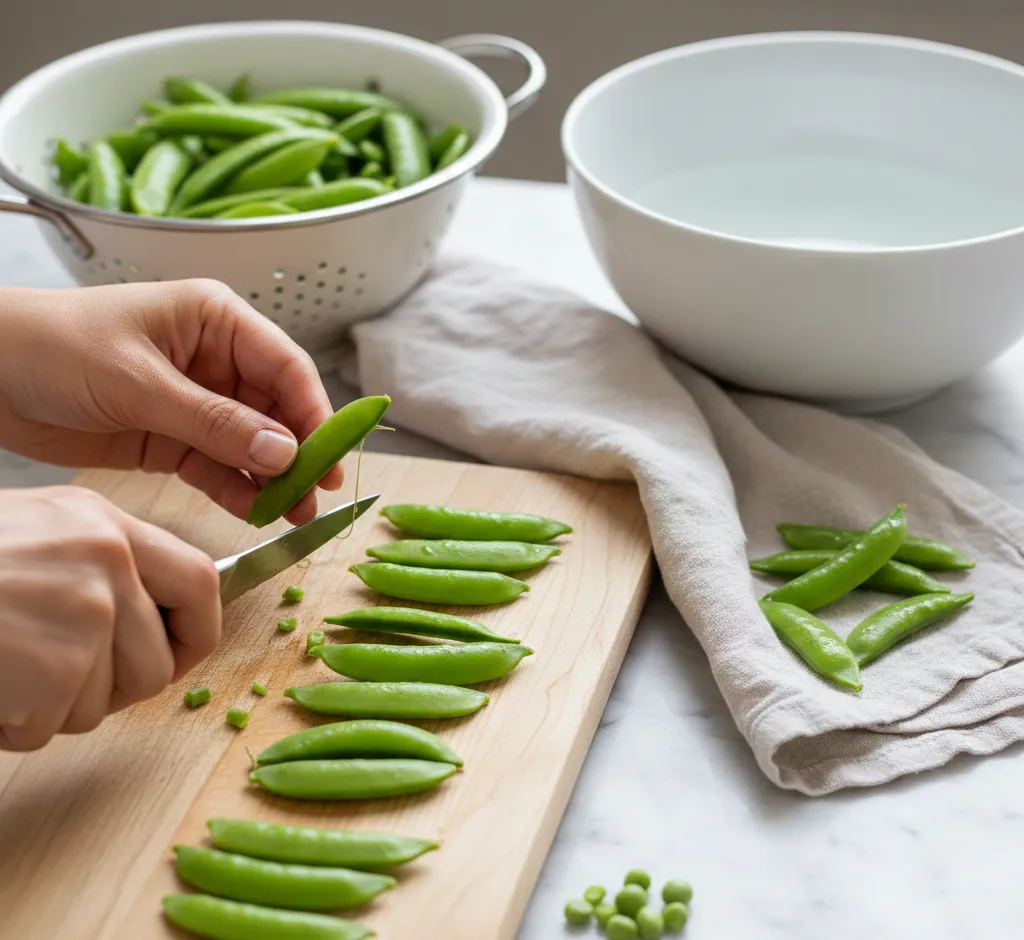
Step 2: Trim the Ends
Each snap pea has a small stem end that can be a bit tough or fibrous. Trimming it makes for a cleaner bite and better presentation.
Fast method for trimming
- Gather a small handful of snap peas and align the stem ends on a cutting board.
- Use a sharp knife to slice off the tips in one clean cut.
- Rotate the peas and trim the opposite ends if they look dry or darkened.
Kitchen shears work well too. Simply hold each pea and snip off the stem end with scissors-style motions. This method is especially convenient if you are prepping a small batch directly over a bowl.
Do you need to trim both ends?
Trimming the stem end is most important because that is where the string usually begins. The opposite tip can be left on if it looks fresh and tender. For a neater appearance in salads or crudité platters, many cooks trim both ends.
Step 3: Remove the Strings (When Needed)
Some modern varieties of snap peas are stringless, but many still have a thin, fibrous string running along the top edge of the pod. Leaving it on can make the peas chewy and less pleasant to eat, especially when served lightly cooked or raw.
How to remove strings quickly
- Hold a snap pea in one hand and locate the stem end.
- Use your fingers or a small knife to grip the string at the stem.
- Gently pull the string down along the top curve of the pod, toward the tip.
- If there is a second string along the bottom, repeat the motion on the other side.
Once you get into a rhythm, stringing snap peas becomes quick and almost automatic. Many people do this step while chatting, listening to a podcast, or watching TV.
How to tell if your snap peas are stringless
- Check the package label. It may say "stringless" or mention a variety known for tender pods.
- Test one pea by snapping the stem end and gently pulling. If no firm string comes away, you can likely skip stringing.
- If the peas are larger and older, they are more likely to have noticeable strings.
When in doubt, string a few peas and taste one. If it chews comfortably without fibrous bits, you can keep prep minimal for the rest.
Step 4: Drying Snap Peas the Right Way
Drying might seem like a small step, but it matters—especially if you plan to store cleaned peas or use them in salads and sautés.
Why drying matters
- Helps prevent sliminess in storage containers.
- Reduces excess water that can cause splattering in hot pans.
- Protects the crisp texture, particularly for raw or barely cooked dishes.
Simple drying methods
- Spread cleaned peas on a clean kitchen towel or paper towels and pat them dry.
- Let them air-dry for a few minutes while you prep the rest of your ingredients.
- For large batches, place them in a colander and gently shake to remove excess water before patting dry.
The goal is not to make the peas bone-dry, just free of visible water droplets.
Time-Saving Hacks for Cleaning Snap Peas
Cleaning snap peas does not have to be time-consuming. A few small changes to your routine can significantly speed things up.
1. Clean the whole batch at once
Instead of cleaning snap peas right before each meal, prep the entire bag or basket at once. This way, you only set up and clean your workstation a single time, and you will have ready-to-use peas for snacks and recipes over the next few days.
2. Use the "line-up and slice" method
Line up a handful of peas with their stem ends facing the same direction and slice the tips off in one motion. This batch approach is faster than trimming each pea individually and keeps your cutting board organized.
3. Delegate string removal
If you are cooking with others, stringing snap peas is the perfect simple task to share. It is safe for older kids with supervision and keeps everyone involved in the cooking process.
4. Skip stringing for certain uses
When peas are very young and tender, and you plan to cook them in a quick stir-fry or sauté, the strings may be barely noticeable. For those nights when you are short on time, you can rinse, trim the stem ends, and cook them as is—especially if you know your peas are a stringless variety.
Cleaning Snap Peas for Different Uses
The way you clean and prep snap peas can vary slightly depending on how you plan to use them.
For raw snacking
- Rinse thoroughly under cool water.
- Trim stem ends and remove strings for the most comfortable bite.
- Dry well so they stay crisp in storage.
Store cleaned peas in an airtight container in the fridge for easy, grab-and-go snacks.
For salads and crudité platters
- Clean carefully, paying attention to appearance.
- Trim both ends for a neat, uniform look.
- Remove strings on both sides to avoid any chewiness.
- Optionally, blanch them for 30–60 seconds in boiling water, then cool in ice water for extra-bright color and tender-crisp texture.
For stir-fries and sautés
- Rinse and trim the stem ends at minimum.
- Remove strings if peas are larger or not labeled as stringless.
- Dry well before adding to hot oil to reduce splatter.
You can leave peas whole for a rustic look or slice them diagonally into halves for faster cooking and more surface area to absorb sauces.
For soups and stews
- Rinse and trim ends as usual.
- Strings should still be removed, since long cooking does not always soften them.
- Cut peas into bite-size pieces if desired, especially for chunky vegetable soups.
How to Store Cleaned Snap Peas
Once your snap peas are washed, trimmed, and (if needed) strung, proper storage keeps them fresh and crisp for days.
Best storage method
- Make sure peas are mostly dry before storing.
- Place them in an airtight container or resealable bag.
- For best texture, line the container with a paper towel to absorb excess moisture.
- Store in the crisper drawer of your refrigerator.
Properly stored, cleaned snap peas usually stay crisp and sweet for about 3–5 days. Use your senses—if they look slimy, smell sour, or feel excessively soft, it is time to discard them.
Can you freeze cleaned snap peas?
Yes, but for the best quality, take one extra step:
- Clean peas as usual (rinse, trim, remove strings).
- Blanch peas in boiling water for 1–2 minutes.
- Quickly transfer them to an ice bath to stop the cooking.
- Drain and dry thoroughly.
- Spread on a baking sheet to pre-freeze, then transfer to freezer bags.
This helps preserve color, texture, and flavor so your peas are ready for stir-fries, pasta, and soups straight from the freezer.
Common Mistakes to Avoid When Cleaning Snap Peas
A few small missteps can affect the taste and shelf life of your snap peas. Here is what to avoid.
- Soaking too long: Extended soaking can make peas waterlogged and dull in flavor. A quick rinse or short soak is plenty.
- Skipping the string on older peas: Mature peas almost always benefit from string removal, especially when served raw or lightly cooked.
- Storing while very wet: Excess moisture encourages slime and spoilage. Always pat peas dry first.
- Leaving damaged pods in the batch: One moldy or slimy pea can affect nearby ones. Remove any that look questionable.
- Cleaning too far in advance: While cleaned peas keep well for a few days, prepping them a week in advance can lead to quality loss.
Frequently Asked Questions About Cleaning Snap Peas
Do you have to wash snap peas if they are pre-washed?
Even if the bag says "pre-washed" or "ready to eat," a quick rinse under cool running water is a smart habit. It helps remove any remaining debris and refreshes the peas before serving.
Are snap peas and snow peas cleaned the same way?
Yes, the basic steps are very similar: rinse, trim ends, and remove strings if present. Snow peas are flatter, but they also often have strings along the edges that benefit from removal for a better texture.
Can you eat snap peas raw without cleaning them?
Technically you can, but it is not recommended. Washing and quick prep take only a few minutes and significantly improve safety, flavor, and overall eating experience.
Is it okay to leave the strings on if you are in a rush?
If your peas are very young, tender, and labeled as stringless, you might not notice the strings much, especially in cooked dishes. For older or larger peas, removing the strings makes a big difference, so it is usually worth the extra minute or two.
Bringing It All Together
Cleaning snap peas does not need to be complicated or time-consuming. With a simple routine—rinse, trim, remove strings when needed, and dry—you can prep a batch in just a few minutes and enjoy crisp, sweet peas all week long.
Use these quick tips to keep your snap peas looking vibrant, tasting fresh, and ready for anything: from crunchy snacks and colorful salads to speedy stir-fries and cozy soups. Once you get into the habit, cleaning snap peas will feel like a natural, easy part of your kitchen routine.