Step‑by‑Step Carrot Washing Instructions: How to Clean Carrots Thoroughly and Safely
Learn exactly how to wash carrots step by step. This detailed guide covers tools, soaking, scrubbing, rinsing, drying, storage tips, and common mistakes to avoid for safe, clean, great-tasting carrots.
Properly washing carrots is one of the simplest but most important steps in safe and healthy home cooking. Whether you grow them yourself or buy them from a market or supermarket, carrots often carry soil, bacteria, and even traces of pesticides on their surface. Learning how to wash carrots correctly helps protect your health, improve flavor and texture, and keep your kitchen more hygienic.
This detailed, step‑by‑step guide will walk you through everything you need to know: from how to prepare your workspace and tools, to the best techniques for scrubbing, rinsing, and drying carrots for different uses such as snacking, cooking, or juicing.
Why Washing Carrots Properly Matters
Carrots grow underground and are in direct contact with soil throughout their development. Even when they look clean, tiny particles of dirt and microorganisms can cling to the skin and small crevices. That is why a quick rinse under running water is usually not enough.
- Food safety: Soil can contain harmful bacteria such as E. coli and other microorganisms that may lead to foodborne illness if not removed properly.
- Reduced pesticide residue: Commercially grown carrots may have surface pesticide residues. Thorough washing lowers your overall exposure.
- Better taste and texture: Gritty, sandy bites can ruin an otherwise delicious dish. Removing soil and debris helps carrots taste sweeter and more pleasant.
- Improved appearance: Clean, bright carrots look more appetizing, especially when served raw on snack platters or in salads.
With these benefits in mind, it makes sense to treat carrot washing as a small but essential part of your regular kitchen routine.
What You Need Before You Start
You do not need any special or expensive tools to wash carrots properly. A few basic kitchen items are enough to get professional-level results at home.
Essential tools and supplies
- Clean sink or large bowl: For soaking and rinsing carrots.
- Cool running water: Helps remove dirt and bacteria without damaging the vegetables.
- Vegetable brush or clean scrub brush: Soft to medium bristles are ideal for scrubbing the carrot skin.
- Cutting board and knife: To trim stems and roots if desired.
- Clean kitchen towel or paper towels: For drying the carrots after washing.
Optional but useful items
- Colander or strainer: Makes rinsing and draining multiple carrots easier.
- Peeler: If you plan to peel the carrots after washing.
- Food‑safe vinegar: A small splash in soaking water can help reduce some surface microbes, although it is not strictly necessary.
Once you have these items ready, you can begin the step‑by‑step washing process.
Step‑by‑Step Carrot Washing Instructions
Step 1: Wash your hands and clean the sink
Before touching any food, you should start by washing your own hands thoroughly. Clean hands prevent transferring additional germs to the carrots while you wash them.
- Wash your hands with warm water and soap for at least 20 seconds.
- Rinse and dry your hands with a clean towel or paper towel.
- Rinse and quickly scrub your sink or the bowl you plan to use, removing any visible debris.
A clean workspace is the foundation of safe food handling.
Step 2: Sort and inspect the carrots
Next, sort through your carrots and quickly inspect them for quality and damage.
- Spread the carrots on a clean surface, cutting board, or tray.
- Remove any rubber bands, twist ties, or packaging.
- Discard carrots that are extremely soft, slimy, or moldy.
- Set aside any carrots with deep cuts or bruises to trim later.
This step ensures you only invest time into washing carrots that are still fresh and safe to eat.
Step 3: Trim the tops and roots (optional)
Many carrots come with leafy green tops or long root tips. Trimming them is optional but often useful for easier handling and cleaner storage.
- Place a carrot on a cutting board.
- Use a sharp knife to cut off the leafy top, leaving about 1–2 cm of stem or cutting right at the root shoulder.
- Trim the thin root tip if it is very long or dried out.
- Repeat with all carrots.
Removing the leafy tops can also help prolong freshness, since the greens draw moisture from the carrot root if left attached.
Step 4: Pre‑rinse under cool running water
Before scrubbing, you should remove the loose soil and debris with a quick rinse.
- Turn on cool running water in your sink or use a faucet sprayer.
- Hold each carrot under the stream of water, rotating it so all sides get rinsed.
- Use your fingers to gently rub off visible clumps of soil.
- Place rinsed carrots in a clean colander or bowl.
This pre‑rinse step makes the later scrubbing easier and more effective, especially for carrots that are heavily covered in dirt.
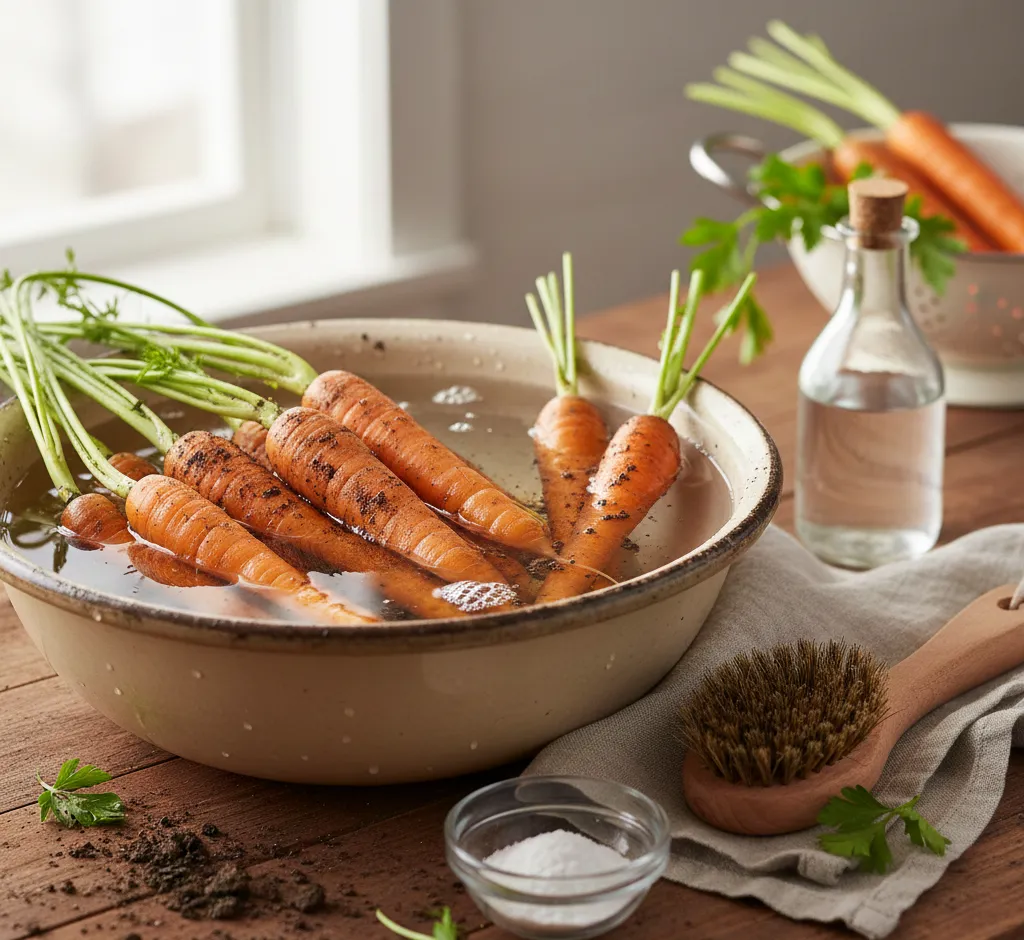
Step 5: Soak for a few minutes (for very dirty carrots)
If your carrots are freshly harvested or particularly muddy, soaking them briefly can loosen stubborn soil and reduce the work needed for scrubbing.
- Fill a clean sink or large bowl with cool water.
- Optional: Add a small splash of food‑grade vinegar (about 1 tablespoon per liter of water) to help dislodge debris and some microbes.
- Submerge the carrots completely in the water.
- Let them soak for 5–10 minutes, gently swishing them around once or twice.
After soaking, you will notice that much of the dirt settles to the bottom of the sink or bowl, making it easier to wash off anything that remains.
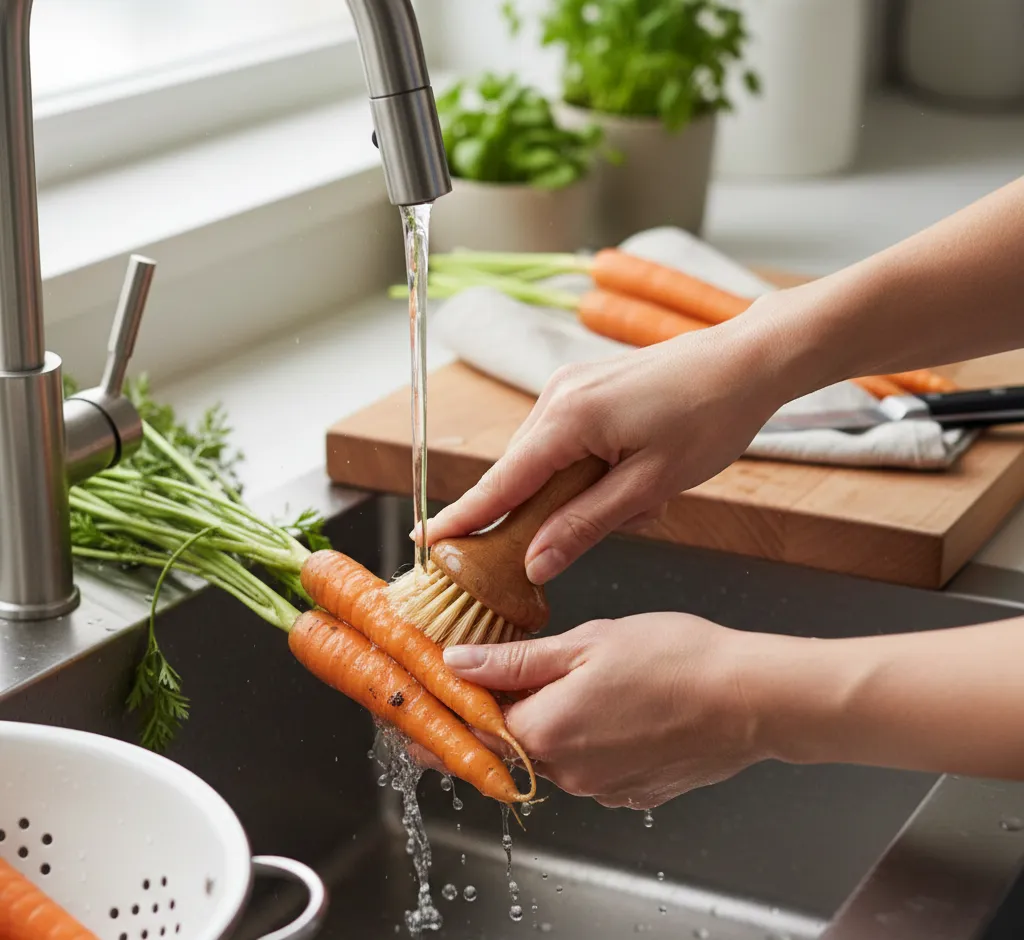
Step 6: Scrub the carrots with a vegetable brush
Scrubbing is the most important part of the carrot‑washing process. It removes the last traces of soil, pesticide residue, and microorganisms from the outer skin.
- Hold a carrot firmly in one hand under a gentle stream of cool running water.
- With the other hand, use a clean vegetable brush to scrub the entire surface.
- Move the brush in small, circular or back‑and‑forth motions along the length of the carrot.
- Pay extra attention to any ridges, creases, or areas near the top where dirt tends to accumulate.
- Continue scrubbing until the skin looks clean and free of visible debris.
- Repeat with each carrot, rinsing the brush frequently to remove dirt.
If you do not have a vegetable brush, you can use a clean, unused nail brush or gently rub the carrots with your hands, though this may not be as effective on very dirty carrots.
Step 7: Final thorough rinse
After scrubbing, you should give the carrots one final rinse to wash away any loosened dirt and debris.
- Place the scrubbed carrots back in a colander.
- Rinse them under cool running water, turning them to ensure all surfaces are flushed clean.
- Check each carrot visually, ensuring no remaining soil or grit is visible.
At this stage, your carrots are ready to be peeled, chopped, cooked, or eaten raw, depending on your recipe.
Step 8: Dry the carrots properly
Drying may seem like a small detail, but it matters for both food safety and storage quality, especially if you are not using the carrots right away.
- Spread a clean kitchen towel or several layers of paper towels on your countertop.
- Lay the freshly washed carrots in a single layer on the towel.
- Gently pat them dry with another towel or paper towels.
- Allow them to air‑dry for a few minutes until no visible moisture remains on the surface.
Dry carrots store better in the refrigerator and are less likely to develop slimy spots from excess moisture.
Should You Peel Carrots After Washing?
Peeled and unpeeled carrots both have their place in the kitchen. Whether you choose to peel them depends on your personal preference and how you plan to use the carrots.
Benefits of keeping the peel
- More nutrients and fiber: The skin and outer layer of carrots contain valuable fiber and micronutrients.
- Less food waste: Leaving the peel on allows you to use more of the vegetable.
- Rustic appearance: Unpeeled carrots can give dishes a natural, rustic look that many people enjoy.
When peeling may be a good idea
- Very rough or damaged skin: If the outer layer is tough, cracked, or heavily blemished, peeling can improve texture.
- Fine dining or special presentations: For very polished, smooth slices or sticks, peeling may look more elegant.
- Older carrots: Peeling can remove any slightly bitter or dried‑out outer layer from carrots that have been stored for a long time.
If you do choose to peel your carrots, always wash them thoroughly first to avoid pushing dirt or bacteria from the surface toward the inside while peeling.
Special Washing Tips for Different Uses
While the basic washing method stays the same, you can adjust your approach slightly depending on how you plan to use the carrots.
For raw snacking and salads
- Wash and scrub particularly carefully, since the carrots will not be cooked.
- Consider peeling for an extra‑smooth texture, especially for children or guests who are picky about skins.
- Cut away any discolored or damaged spots after washing.
For cooking (roasting, boiling, stir‑frying)
- Thorough washing is still essential, but tiny cosmetic marks are less critical since carrots will be cooked.
- You may choose to leave the peel on for extra flavor and nutrients.
- Trim ends neatly to give a more uniform look in dishes like roasted vegetable medleys.
For juicing or smoothies
- Wash and scrub very well because you will use the entire carrot, and the juice concentrates everything on the surface.
- Peeling is optional, but many people prefer peeled carrots for a slightly milder, cleaner‑tasting juice.
- Remove any green tops or very woody ends that might add bitterness.
How to Store Carrots After Washing
Once your carrots are clean, proper storage helps keep them crisp, sweet, and safe to eat for as long as possible.
Short‑term storage (up to 3 days)
- Place the dried carrots in an airtight container or a resealable plastic bag.
- Store them in the crisper drawer of your refrigerator.
- If you prefer, line the container with a paper towel to absorb any leftover moisture.
Longer storage (up to 1–2 weeks)
- For long storage, some people prefer not to wash carrots until just before use, to avoid excess moisture.
- If you must wash in advance, make sure they are completely dry before storing.
- Check stored carrots regularly and remove any that become soft or slimy.
Keeping washed carrots tightly sealed and dry helps maintain their crunch and flavor for several days.
Common Mistakes to Avoid When Washing Carrots
Even though washing carrots seems simple, a few common mistakes can reduce effectiveness or lead to faster spoilage.
- Using hot water: Hot water can slightly soften the carrots and encourage bacteria growth. Always use cool water instead.
- Soaking for too long: Extended soaking (over 20–30 minutes) can cause carrots to lose some crispness and flavor.
- Skipping the scrub brush: Rinsing alone may leave fine dirt and microbes on the skin.
- Not cleaning the sink first: Washing vegetables in a dirty sink can re‑contaminate them.
- Storing carrots while still wet: Extra moisture encourages mold and spoilage in the refrigerator.
By avoiding these errors, you make your carrot‑washing routine safer, more efficient, and more effective.
Frequently Asked Questions About Washing Carrots
Do I need soap or special produce wash?
No. Food safety experts generally advise not using soap or chemical detergents on fruits and vegetables. Cool running water and physical scrubbing with a clean brush are enough to remove most surface dirt and microbes. If you wish, a small amount of food‑grade vinegar in the soaking water is acceptable, but it is optional.
Can I wash carrots in advance?
Yes, you can wash carrots in advance if you dry them thoroughly and store them properly. For the longest shelf life, many people prefer to store carrots unwashed and only clean them right before use. If convenience is more important to you, pre‑washing a batch of carrots once or twice a week can save time on busy days.
Is it safe to eat unpeeled carrots?
Yes, it is safe to eat unpeeled carrots as long as you wash them thoroughly. The peel is edible and contains beneficial nutrients and fiber. Peeling is mostly a matter of personal preference and recipe style.
Do organic carrots need the same washing steps?
Organic carrots may have lower levels of synthetic pesticide residues, but they are still grown in soil and can carry bacteria just like conventional carrots. You should wash organic carrots using the same careful steps: rinse, scrub, and dry.
Conclusion: Make Carrot Washing a Simple Habit
Washing carrots properly does not take much time, but it makes a major difference for food safety, flavor, and overall kitchen hygiene. By following a clear, step‑by‑step process—pre‑rinsing, soaking if needed, scrubbing with a vegetable brush, giving a final rinse, and drying thoroughly—you can enjoy clean, crisp carrots in every dish.
Once you make this routine a habit, it becomes second nature whenever you bring carrots home from the store or harvest them from your garden. With just a bit of care at the sink, you can serve carrot snacks, salads, juices, and cooked dishes that are both delicious and confidently clean.