How to Clean Brussels Sprouts Properly: A Step‑by‑Step Guide
Learn how to clean Brussels sprouts properly with this step-by-step guide. Discover how to trim, soak, rinse, and dry Brussels sprouts for roasting, steaming, or raw salads, plus storage tips and common mistakes to avoid.
Brussels sprouts are a nutritious, versatile vegetable that can be roasted, sautéed, steamed, or shaved into salads. However, their tightly packed leaves and small size mean they can trap dirt, sand, and tiny insects. If you do not clean them properly, even the best recipe will taste gritty or unpleasant.
This detailed guide will show you exactly how to clean Brussels sprouts properly, step by step. You will learn how to inspect, trim, soak, and dry them, as well as how to prepare them depending on whether you plan to roast, steam, or eat them raw. Follow these tips and you will get perfectly clean, fresh-tasting Brussels sprouts every time.
Why Properly Cleaning Brussels Sprouts Matters
Many people skip or rush the cleaning step and end up with Brussels sprouts that are bitter, dirty, or unevenly cooked. Taking a few extra minutes to clean them well has several benefits:
- Better flavor: Removing damaged outer leaves and any dirt or debris helps reduce bitterness and off-flavors.
- Better texture: Clean sprouts roast and brown more evenly, giving you a crisp outside and tender inside.
- Food safety: A good rinse helps remove bacteria, pesticide residue, and tiny insects that may be hiding between the leaves.
- Better appearance: Fresh green leaves without blemishes or dark spots make your dishes look more appetizing.
Once you know how to clean Brussels sprouts correctly, you can prep them quickly and with confidence, no matter the recipe.
How to Choose Fresh Brussels Sprouts
Cleaning starts with choosing good-quality sprouts. The fresher they are, the easier they will be to clean and the better they will taste.
What to Look For at the Store or Market
- Color: Choose sprouts that are bright green. A few pale or slightly yellow outer leaves are normal, but avoid sprouts that are mostly yellow or brown.
- Firmness: The sprouts should feel firm and compact when you gently squeeze them. Soft or spongy sprouts are past their prime.
- Tight leaves: Leaves should be tightly packed, not loose and opened. Very loose leaves often indicate age or damage.
- Size: Smaller sprouts (about 2–3 cm across) are usually sweeter and more tender than very large ones.
- Stems: The stem ends should look freshly cut, not dry, dark, or shriveled.
Buying on the Stalk vs. Loose
Brussels sprouts are sometimes sold on the stalk. These are often fresher and can last longer if stored correctly. Loose sprouts are more common and perfectly fine as long as they meet the quality points above.
Tools and Ingredients You Will Need
You do not need anything fancy to clean Brussels sprouts properly, but having the right tools makes the process quicker and safer.
- Cutting board: A stable board for trimming the stems and halving the sprouts.
- Sharp paring knife: Essential for precise trimming and cutting without crushing the sprouts.
- Large bowl: For soaking and rinsing the sprouts in water.
- Colander or strainer: To drain the sprouts easily after soaking.
- Clean kitchen towel or paper towels: For drying the sprouts thoroughly before cooking.
- Cold water: The main “ingredient” for cleaning and refreshing the sprouts.
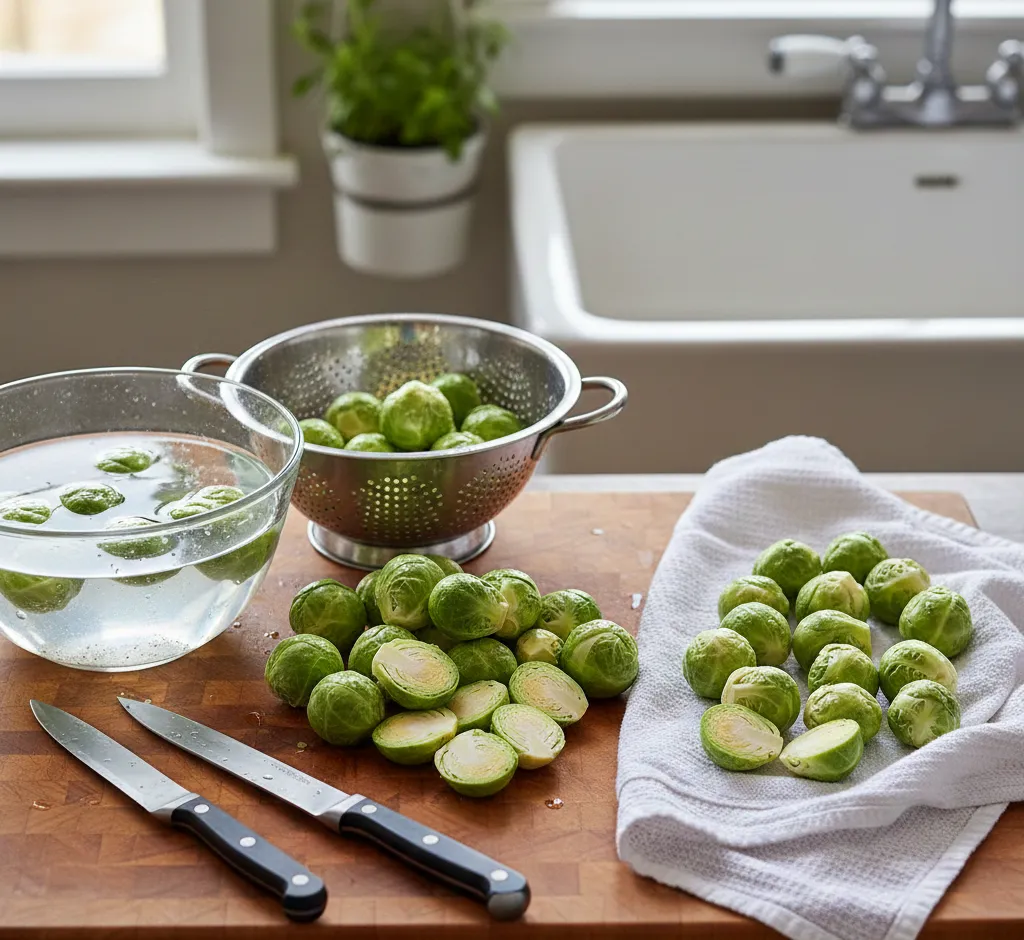
Step‑by‑Step: How to Clean Brussels Sprouts
Follow this simple process every time you prepare Brussels sprouts. You can adjust the final cuts (whole, halved, quartered, or shredded) depending on your recipe.
Step 1: Sort and Inspect the Sprouts
Start by emptying your Brussels sprouts onto a clean surface. Quickly sort through them and separate any that are obviously damaged or rotten.
- Discard sprouts that are very mushy, have a strong bad smell, or are covered in dark moldy spots.
- Set aside sprouts with a few blemished leaves. You can usually salvage these by peeling away the damaged outer layers.
Inspect the stems and outer leaves. A few dry edges or slightly yellow leaves are normal and will be removed in the next step.
Step 2: Trim the Stems
Each Brussels sprout has a small stem end where it was attached to the stalk. This area is often dry, woody, or slightly browned. Trimming it makes the sprout more tender and opens up any damaged leaves that need to be removed.
- Place a sprout on your cutting board with the stem facing your knife.
- Using a sharp paring knife, cut off a thin slice (about 2–3 mm) from the bottom of the stem.
- Avoid cutting too deeply into the base, or the entire sprout may fall apart.
The goal is to remove only the dried or discolored portion while keeping the core mostly intact.
Step 3: Remove Damaged Outer Leaves
After trimming the stem, some outer leaves may naturally loosen and fall off. This is good; these are usually the dirtiest or most damaged layers.
- Peel away 1–3 of the outermost leaves, especially if they look wilted, yellow, or spotty.
- If the sprout still has visible dark spots or insect damage, gently peel additional leaves until you reach clean, healthy layers.
- Discard all removed leaves.
Be careful not to over-peel. You want to remove only the parts that look damaged, dry, or dirty.
Step 4: Cut the Sprouts (Optional but Recommended)
While you can cook small Brussels sprouts whole, cutting them exposes the inner layers to water during washing and helps them cook more evenly. How you cut them depends on their size and your cooking method.
Cutting Options
- Leave whole: Best for very small sprouts or when you plan to blanch and then roast them.
- Halved: The most common option. Cut from stem to tip to create two symmetrical halves.
- Quartered: Good for large sprouts or for quick sautéing and stir-fries.
- Shredded: Ideal for salads or slaws. Slice thinly from top to bottom to create ribbons of leaves.
If you plan to roast Brussels sprouts, cutting them in half is usually ideal: they cook faster, brown better, and are easier to clean inside.
Step 5: Soak in Cold Water
Soaking is the key step that many people skip. Cold water helps loosen dirt, sand, and any small insects hidden between the leaves.
- Fill a large bowl with cold water.
- Place the trimmed Brussels sprouts into the bowl. If they are halved or quartered, separate them slightly with your fingers.
- Swish the sprouts around gently with your hand to dislodge dirt.
- Let them soak for 5–10 minutes.
During soaking, dirt and debris usually sink to the bottom of the bowl. If the water looks very dirty, you can repeat the soaking process with fresh water.
Step 6: Rinse Thoroughly
After soaking, you still need to give the Brussels sprouts a final rinse to remove anything that has loosened.
- Lift the sprouts out of the bowl with your hands or a slotted spoon, rather than pouring, so the dirt stays at the bottom of the bowl.
- Transfer the sprouts to a colander.
- Rinse under cold running water, tossing them gently with your hands to clean all sides.
Check a few sprouts visually. You should no longer see sand, specks of dirt, or insects between the leaves. If you do, repeat the soak and rinse.
Step 7: Dry the Brussels Sprouts
Drying is especially important if you plan to roast the sprouts. Excess surface moisture can cause them to steam instead of crisp and brown.
- Shake the colander gently to remove excess water.
- Spread the Brussels sprouts out in a single layer on a clean kitchen towel or paper towels.
- Pat them dry thoroughly with another towel, focusing on cut sides.
- Let them air-dry for a few minutes while you preheat your oven or prepare your pan.
If you are short on time, at least pat the cut sides very dry. The drier they are, the better they will roast.
How to Clean Brussels Sprouts for Different Cooking Methods
The basic cleaning steps stay the same, but you can slightly adjust how you prep the sprouts based on how you plan to cook them.
For Roasting
Roasted Brussels sprouts need a dry surface to caramelize and crisp up.
- Trim and peel as described above.
- Cut the sprouts in half from stem to tip (or quarter large ones).
- Soak, rinse, and then dry them very well, paying special attention to the cut sides.
- Spread them out on a baking sheet with space between pieces so moisture can evaporate.
Well-cleaned and dried sprouts will brown beautifully and develop a sweet, nutty flavor.
For Steaming or Boiling
When steaming or boiling, moisture is less of a concern, but you still want your sprouts clean and evenly sized.
- Trim the stems and remove outer leaves.
- Leave small sprouts whole, but lightly score a shallow "X" into the bottom of the stem to help them cook evenly.
- Halve or quarter larger sprouts so all pieces are roughly the same size.
- Soak and rinse as usual.
Because they will be in direct contact with water, a thorough rinse is especially important to eliminate any remaining grit.
For Raw Salads and Slaws
Eating Brussels sprouts raw requires extra attention to cleanliness and texture.
- Choose the freshest, smallest sprouts you can find, as they are milder and more tender.
- Trim and peel away any damaged leaves.
- Soak and rinse carefully; you do not want any dirt in a raw salad.
- Dry the sprouts completely before slicing, or the shreds can become soggy.
- Thinly slice or shred using a sharp knife or mandoline.
Because there is no cooking step to kill bacteria, start with high-quality sprouts and clean them thoroughly.
Common Mistakes When Cleaning Brussels Sprouts
Even a simple process can go wrong if you do not pay attention to a few details. Avoid these common mistakes:
- Skipping the soak: A quick rinse under running water rarely removes all the dirt inside tightly packed leaves. Soaking is worth the extra few minutes.
- Over-trimming the stem: Cutting too much off the base causes the whole sprout to fall apart into loose leaves.
- Over-peeling: Removing too many layers wastes edible parts and leaves you with tiny sprouts that cook unevenly.
- Not drying before roasting: Wet sprouts steam instead of roast, so they stay pale and soft instead of browned and crispy.
- Using dull knives: A dull knife crushes and tears the sprouts instead of cutting cleanly, which can affect both texture and appearance.
How to Store Cleaned Brussels Sprouts
You can clean Brussels sprouts ahead of time to save prep work on busy days. The key is to store them properly so they stay fresh and do not get soggy.
Short-Term Storage (1–3 Days)
- Clean, trim, and cut the sprouts as needed.
- Dry them thoroughly to remove as much moisture as possible.
- Place them in an airtight container or a resealable bag lined with a paper towel to absorb any excess moisture.
- Store in the vegetable drawer of your refrigerator.
Use prepped sprouts within 1–3 days for the best flavor and texture.
Longer Storage (Up to a Week)
If you want them to last longer, it is usually better to store them before washing.
- Keep unwashed, untrimmed Brussels sprouts in a breathable bag (like a paper bag) in the refrigerator.
- Wash and trim them just before cooking.
- Check them every few days and remove any sprouts that are starting to yellow or soften.
Whole sprouts stored this way can often last up to a week, sometimes a bit longer, depending on freshness at purchase.
Frequently Asked Questions
Do I have to soak Brussels sprouts in salt, vinegar, or baking soda?
Plain cold water is usually enough to clean Brussels sprouts effectively. Some people like to add a small splash of vinegar to the soaking water as a natural cleaner, but it is not required. If you do, rinse thoroughly afterward to remove any residual taste. There is generally no need for salt or baking soda when cleaning Brussels sprouts.
Can I wash Brussels sprouts the day before cooking?
Yes, you can wash and trim Brussels sprouts a day in advance. Just make sure to dry them very well before storing, and keep them in an airtight container lined with paper towels in the refrigerator. If you plan to roast them, pat them dry again right before cooking to ensure they crisp up nicely.
Is it safe to eat Brussels sprouts raw?
It is safe to eat Brussels sprouts raw as long as you clean them thoroughly and start with fresh, high-quality sprouts. Shredded raw Brussels sprouts are popular in salads and slaws. However, some people find them easier to digest when lightly cooked, so listen to your body and adjust accordingly.
How do I know if a Brussels sprout has gone bad?
Signs that a Brussels sprout is no longer good include a strong, unpleasant odor, very soft or mushy texture, slimy surfaces, or large dark or moldy spots. A little discoloration on outer leaves can be peeled away, but if the entire sprout looks affected or smells bad, it is best to discard it.
Should I wash frozen Brussels sprouts?
Frozen Brussels sprouts are pre-cleaned and blanched before freezing, so you do not need to wash them. Simply cook them according to the package instructions. However, for the best texture and flavor, many people prefer fresh Brussels sprouts, especially for roasting.
Final Tips for Perfectly Clean, Delicious Brussels Sprouts
Cleaning Brussels sprouts properly does not have to be complicated. With a sharp knife, a bowl of cold water, and a few extra minutes, you can remove dirt, debris, and damaged leaves and reveal fresh, vibrant sprouts ready for any recipe.
- Always start with the freshest Brussels sprouts you can find.
- Trim stems lightly and remove only the outer leaves that look damaged or dirty.
- Soak in cold water and rinse thoroughly to flush out hidden dirt.
- Dry them well, especially before roasting, for the best texture.
- Store cleaned sprouts properly if prepping ahead.
Once you master this simple cleaning routine, you will be ready to enjoy Brussels sprouts at their best—sweet, tender, and perfectly clean in every bite.